Planning eLearning content without a storyboard is kind of like going on a vacation without a destination or a plan to get there … it may sound like an adventure, but it might be a bumpy ride.
Storyboarding is a planning process that was originally created to pre-visualize sequences of events in motion pictures and animations. But for eLearning, storyboarding helps simplify the complex task of planning your content for the most impactful learning experience. By organizing your concepts in a story map, it makes planning out your training videos, activities, and materials much easier.
In this blog, we’ll show you how to use three of the most common types of eLearning storyboard techniques and templates used by online course creators to simplify and speed up their planning process. We’ll also share our favorite storyboarding tools that we use to create courses at Thinkific.
Why should you create a storyboard?
Adding an extra step to the planning process to save yourself time seems counterintuitive, but it’s true– storyboarding can save you a lot of time in the instructional design process, and help you collaborate better with others.
Creating a storyboard helps keep your training focused, and makes sure you hit all the important points in your student’s learning journey to get them to their desired outcome.
Here’s why:
- Measure twice, cut once: Jumping into development mode before organizing a script or a storyboard could come back to bite you later on. Sketching it out will make pre and post-production a lot easier because there’s a lower chance that you have to go back and reshoot things.
- Collaboration: Storyboarding is useful when collaborating with others, like subject matter experts, team members, and freelancers. A storyboard will help you avoid confusion by showing them exactly what you had in mind.
How are eLearning storyboards used?
In film production, storyboards assist in planning your overarching plotline, helping the narrative flow from one scene to the next. In Instructional Design, storyboards help you in a similar way.
Here’s a high-level overview of the main storyboarding use cases for online courses:
- Planning a video or series: Mapping the scenes and storyline of your instructional videos with visual, production, and narration elements.
- Planning a course or lesson: Map learning objectives and individual learning modules in the learning sequence students follow as they make their way through.
What to include in a storyboard:
We’ll share specifics in the templates we provide, but generally, a storyboard should contain the following items:
- A naming convention: Especially if you’re doing this in bulk, it’s helpful to pick a naming convention to mark on all your slides to reflect the course, lesson, and section within the lesson. For example: [Storyboarding Course | Lesson 1 | Section 1], or shortened to [SBC | L1 | S1].
- Slide numbers and names: You’ll want to tag each slide or page so that you can easily find them once you’re ready to start producing.
- Graphical and written descriptions: Depending on which template you choose, you’ll need visuals or a description of what’s happening.
- Transcripts: In addition to what’s visually happening in the scene, what’s being said?
- Production notes: How are you going to set up the scene, and transition between scenes.
- Navigation: Where does this slide fit within your overarching production, or your course.
- Literally whatever you need: Your storyboard is designed to help you cut through complexity and facilitate a transformation for your student. Customize our templates and make them your own. (And let us know what you come up with!)
Steps in the storyboard creation process
- Plan the transformation: Your goal, as an educator is getting your students from A to B. Framing out their journey towards mastery will help you fill in the dots in between their current reality (A), to their desired future (B).
- Create learning objectives: Understanding specifically what your students will learn in your course, or a video lesson will help ensure you’re hitting the mark. Try framing your thoughts like this: “After watching this training video, my students will be able to ___________”.
- Create your storyboard template: Our storyboard templates are a great starting point, but we encourage you to make them your own. It’s a good idea to use landscape mode, number your slides, and mark up any info on the lesson, or module each slide is for. This will help you a lot later on when you’re revisiting your notes, or in production mode
- Fill in the blanks: For each slide, duplicate your template and fill in the blanks.
- Double Check: Once you’re happy with your storyboard, go back to your learning objectives statement in step two and ask yourself, “will this video teach my students how to ______________?”, and ask yourself why it will work.
- Get Feedback: Get feedback from SMEs, students, or your team. Ask them if they think your content will accomplish the learning transformation you set out to create.
What types of storyboards are used in eLearning?
Storyboarding is mostly used in video production, but it can also be used at a higher level to plan your course.
There are three main formats you can use for your storyboard, which we’ll elaborate on with examples:
- Visual storyboards: Image-based, to sketch out your scenes and production considerations in a training video.
- Written storyboards: Text-based, used to plan simple videos where scenes don’t change much, like a talking-head video … Also can be used to plan your course or a lesson within it.
- Instructional design storyboards: Can be visual or written, used to create a high-level outline of your course or a lesson, and the learning journey your students take as they make their way through it.
You can use a combination of these storyboarding techniques to get the job done.
Now let’s dive into each storyboard, with some examples and best practices!
Visual storyboards
This type of storyboard is useful when you’re in the weeds of planning individual training videos for your course.
Visual Storyboards help you visualize the flow of your video using sketches and pictures to give you a sense of how your video will flow before creating it.
Whether you’re creating an animated training video or filming yourself talking, this is valuable because it gives you a chance to adjust your narrative or key learning points before you invest time in shooting and editing.
The fact that visual storyboards are meant to be rough is a benefit when collaborating with others because at this stage in the process, it’s helpful to get feedback on the content and the story arc. Your choice of colors for clothing, props, or the backdrop doesn’t really matter.
This helps you get context on what’s happening in your video, and how it will look and feel without getting distracted by elements that put polish on the final product.
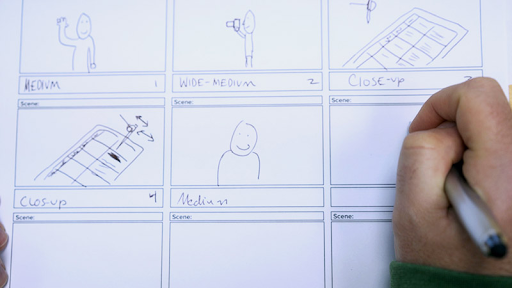
You can either draw your storyboard by hand or create a digital storyboard on your computer:
- Thumbnail Storyboards are rough sketches by hand. They’re called thumbnail storyboards because they’re usually no larger than the size of your thumbnail. Print one of our templates, and grab a pencil.
- Digital Storyboards are digital sketches that are a little cleaner. If you’re not artistically inclined, use a free image site to grab some clip art to work with.
Here’s an example of both storyboards from a visual storyboarding class created by our friends at Techsmith:
Visual storyboarding tips
- Include additional notes: Also include narration, and production notes, like what text should be on the screen, and how you’re transitioning between scenes.
- Use a pencil: If you’re storyboarding by hand–as painter Bob Ross put it, you will make some happy little mistakes.
- Done is better than perfect: You’re not painting the Mona Lisa so don’t worry how rough your storyboard is–do enough to make a plan.
Visual storyboard templates
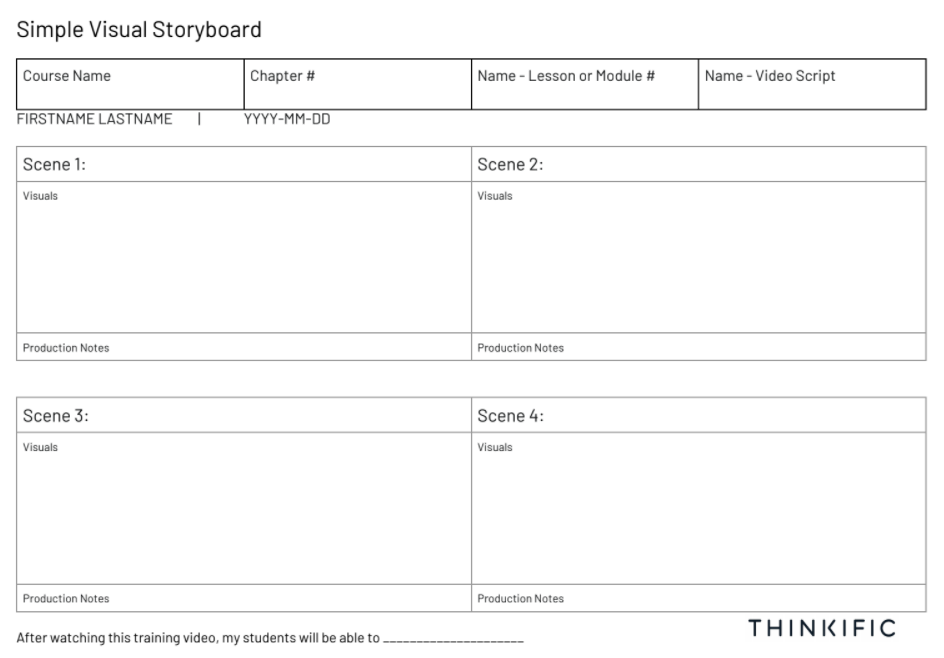
Simple Visual Storyboard
| Visual and text storyboard
|
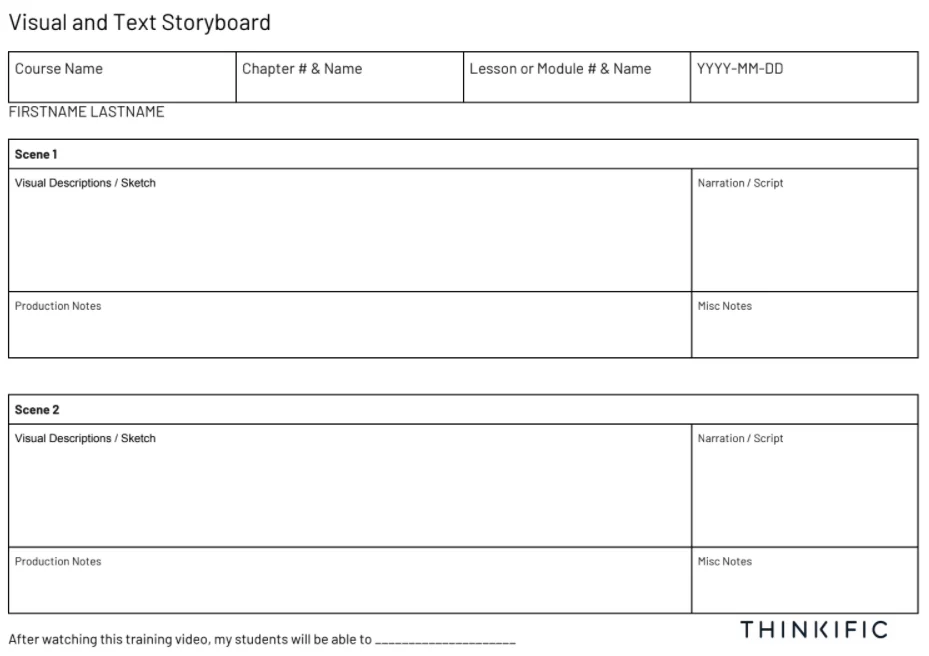
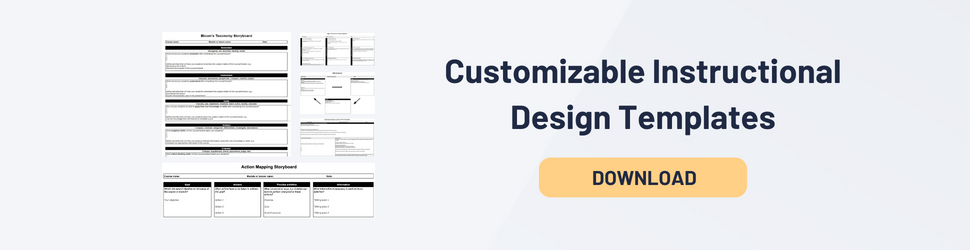
Copy our eLearning Storyboard Templates
Written storyboards
You can also create a storyboard to plan your course or video using only text.
In video production, this kind of storyboard is helpful if you’re using a very simple video format, like a talking head video, because drawing the same stick figure sitting at a desk six times on a visual storyboard probably won’t add much value.
In course planning, written storyboards are helpful when you’re planning your curriculum or a lesson plan, and need to communicate a lot of information.
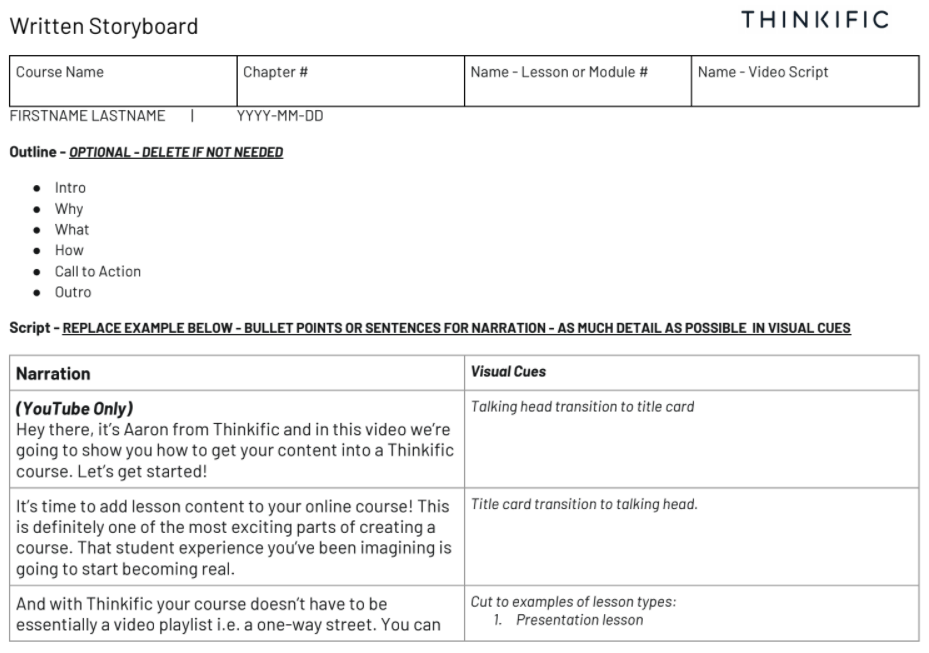
Written storyboard template
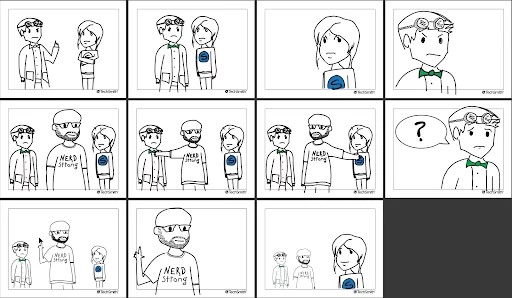
Here’s a great example of a written storyboard created by Thinkific’s very own Aaron Morin for a training video explaining how to upload content to our course builder:
Written storyboard tips
- Create an outline: An outline can help you plan the sections in your video before you start scripting.
- Align your narration and visual cues: Keeping your narration and visual cues organized beside each other will help you avoid confusion.
- Include additional notes: Since you’re not relying on visuals, you’ll want to be extra descriptive to capture what’s happening in your scene and make note of any production considerations.
Instructional design storyboards
In this type of storyboard, you’re jumping out of the weeds to get a birds-eye view of your entire course or a module within it.
These can be used for learning objectives, curriculum development, lesson plans, learning activities, and you can use a combination of text and images.
Learning objectives storyboard using Bloom’s Taxonomy
You can create a storyboard using Bloom’s Taxonomy verbs to describe what levels are being addressed for just about anything you want to map:
- learning objectives
- lessons
- curriculum mapping
- synchronous and asynchronous learning
- group activities that facilitate learning
Each square represents a level of mastery, where students first need to remember and understand the concept before they’ve mastered it, where they can analyze and create solutions.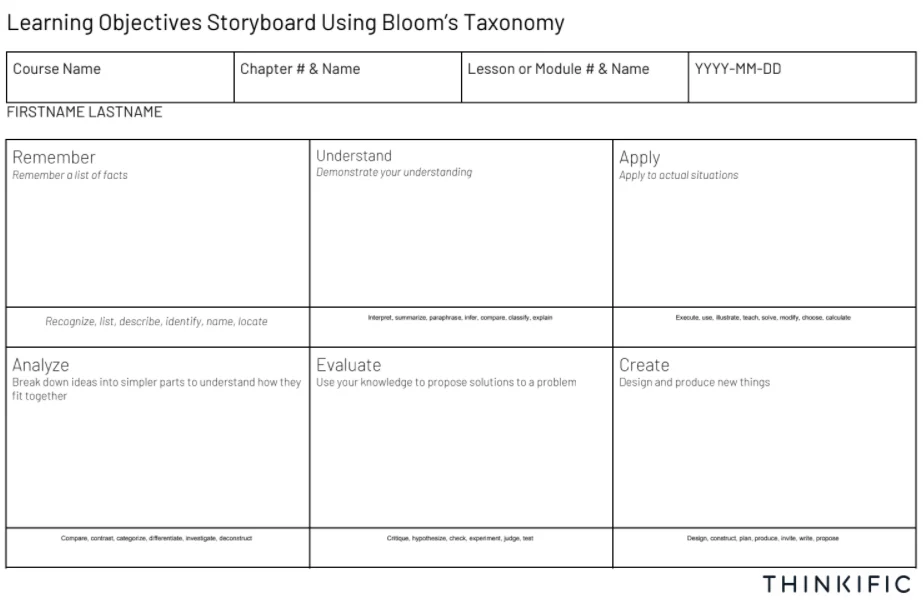
Learning objectives storyboarding tips
- Planning your course: List the lessons and sections that help your students at each stage.
- Planning your lessons: List the sections within your lesson that touch on each stage.
Not sure which storyboarding method is for you?
Here’s a breakdown of the situations where you can use the storyboards we’ve shared.
Type | Best use |
| Visual storyboard | Video training content that includes multiple visual scenes, environments, or objects to communicate your key points. Examples:
|
| Written storyboard | Training content that is cerebral, where a talking head on camera or written materials might be your chosen route to explain complex concepts, or communicate a lot of information, like a course outline. Examples
|
| Instructional Design Storyboard
| Any training content that is methodical and requires the student to retain and apply concepts to solve problems. An Instructional Design Storyboard is a helpful approach for a mixed set of subjects, from hands-on to cerebral content. Examples
|
Of course, each method has its own strengths. It often works well to use a combination of each tool depending on what type of lesson formats and components you’re focused on developing at the moment.
What tools can you use to create your eLearning storyboard?
- Microsoft word (or google docs): Word docs are really easy to work with because most people know how to use them, and they’re portable, meaning it’s easy for you to share them with anyone to get feedback. Word docs are better for written storyboards where you need a lot of information.
- Powerpoint (or google slides): Another common way to create storyboards is on Powerpoint (or Google Slides). You have less space to work with, but it’s much easier to drag things around and duplicate slides.
- Miro: If you want to take your storyboarding to the next level, consider using Miro, an online visual collaboration platform. We LOVE using miro to plan our courses and content at Thinkific. Miro is FREE, and makes it easy to brainstorm or mind map because you have virtually unlimited space to work with–you could have all your storyboards for an entire course or a video series in one place.
To use Miro for storyboarding, set up your free account, create a board, paste an image of one of our storyboards, and start adding sticky notes!
What to do after your storyboard is done
Once you’ve completed your storyboard, here are a few quality assurance measures to top it off:
- Feedback. Get feedback from team members, subject matter experts, and potential students. Tell them your intent for the learning experience, and ask whether or not your storyboard can accomplish that.
- Do it again from scratch. Determining whether or not you agree with yourself is a helpful gut check. Sleep on it, and then without cheating, try doing it again from scratch and compare notes. Did anything change?
Curious what comes next after storyboarding in the course creation process? Check out our helpful guide on how to get started creating your online course.
Conclusion
Congratulations! You’ve just taken the first step towards creating more effective educational content. Hopefully, by now you’re armed with the strategy and the templates you need to develop an effective eLearning storyboard.
The next best thing you can do while it’s fresh is to create a copy of our templates and start planning!
We’d love to hear from you! Join Thinkfic’s Course Creator Community–ask questions, and share your wins, and get inspired by others.
if you’d like to submit a storyboarding template to our library for credits, get in touch!